
How to Install a Loft Ladder: A Step-by-Step Guide
20th December 2023
Installing loft ladders can be easy. FAKRO & Keylite loft ladders are renowned for their ease of installation within the roof window market. So, here is our quick & easy guide on how to install a loft ladder & other contributing factors.
In this blog, we will cover how to install a loft ladder to a standard rectangular loft structural opening.
What tools do I require to install loft ladders?
These are our suggested tools to install the ladders & usually are absolutely necessary.
- Installation guide provided within the box.
- Screwdriver
- Tape Measure
- Carpenter’s square
- Pencils
- Hammer
- Saw
- Screws
- Cordless drill
- Safety PPE
How to Install loft ladder?
- Selecting the Ideal Position for Your Loft Ladder
- Easy tips for finding the best spot
- Ensuring accessibility and space clearance
- Considerations for a hassle-free installation
- Creating a Structural Opening in Your Roof
- Essential steps for new or enlarged openings
- Tools required and safety measures
- Important considerations before cutting
- Unboxing and Preparing Your Loft Ladder
- Checking parts and necessary tools
- Ensuring correct sizing and assembly
- Preparing for a smooth installation process
- Installing Support Battens for Stability
- Adding essential support for safety
- Ensuring secure installation
- Crucial steps for stability
- Efficient Installation of the Loft Ladder
- Step-by-step installation guide
- Securing the ladder in place
- Testing for functionality and safety
- Securing the Hatch for Safe Usage
- Steps to install and secure the hatch
- Ensuring proper closure and stability
- Finalizing the installation process
- Checking the Direction of the Loft Ladder
- Ensuring proper orientation
- Aligning with joists for safety
- Important pre-installation checks
- Securing Folding Section & Steps to the Opening
- Key steps for stability and safety
- Ensuring proper alignment
- Testing for secure installation
- Finalizing with Bolts and Hinges
- Crucial steps for stability
- Bolting for safety and stability
- Ensuring proper functionality
- Thoroughly Testing Your Loft Ladder
- Ensuring safety through testing
- Key steps to check stability
- Ensuring a secure installation
1. Selecting the ideal position for your loft ladder.
Before you start installing your loft ladder, you need to decide on the best position for it. The ideal location for your loft ladder will depend on the layout of your home, the height of your ceiling, and the space available in your loft.
Here are some tips to help you position your loft ladder:
- Choose a location that is easily accessible and does not require you to move furniture or other items out of the way.
- Make sure there is enough clearance above the loft ladder for you to climb up and down comfortably.
- Ensure that the location you choose does not interfere with any electrical or plumbing fixtures in your loft.
- Consider installing a loft hatch if you do not already have one. This will provide easy access to your loft and make it easier to install your ladder.
Once you have chosen the best location for your loft ladder, you can start measuring and cutting the opening for your loft hatch. Make sure you follow the manufacturer's instructions carefully, and use the correct tools and safety equipment when cutting the opening.
Remember, installing a loft ladder can be a challenging task, especially if you are not experienced in DIY projects. If you are unsure about any aspect of the installation process, it is always best to seek professional help to ensure that your ladder is installed safely and securely.

2. Create a Structural Opening in Your Roof Existing or Non-Existing
If you already have a loft hatch, then you can skip this step. However, if you don't have an existing loft hatch, you will need to create a new structural opening in your roof.
Before you start, make sure that you have all the necessary tools and materials, including a saw, a drill, a hammer, and a ladder. You will also need to obtain the necessary permits from your local council before you start any structural work.
The first step is to determine the location of the new loft opening. Choose an area that is easily accessible and that will not interfere with any existing wiring or plumbing. Once you have chosen the location, mark out the area with a pencil.
Next, use a saw to cut through the ceiling and into the loft space. Be careful not to cut through any structural beams or joists. Once you have cut through the ceiling, you will need to reinforce the opening with timber. Measure the size of the opening and cut a piece of timber to fit. Secure the timber to the surrounding joists with screws.
If you have an existing loft hatch, but it is too small for your new loft ladder, you will need to enlarge it. This involves cutting away part of the ceiling and reinforcing the opening with timber. Follow the same steps as above, making sure to secure the timber to the surrounding joists.
Creating a new structural opening or enlarging an existing one can be a challenging task, especially if you are not familiar with DIY. If you are unsure about any aspect of this process, it is best to seek the advice of a professional tradesperson.
 < Keylite opening sizes ONLY*
3. Unbox your loft ladder.
Before you start installing your loft ladder, you need to unbox it and make sure that all the parts are present. Most loft ladder kits come with the following parts:
- Ladder
- Hinges
- Handrail
- Fixing screws
- Installation instructions
Make sure that you have all the parts before you start installing the loft ladder. Check that the ladder is the right size for your loft hatch. If it is too big, you will need to cut the hatch to size before you start the installation.
Once you have confirmed that you have all the parts, you can start assembling the ladder. Follow the manufacturer's instructions carefully to ensure that you assemble the ladder correctly. If you are unsure about any aspect of the installation, seek advice from a professional.
It is also important to make sure that you have all the necessary tools before you start the installation. You will need a drill, screws, a saw, a level, and a measuring tape. Make sure that you have everything you need before you start the installation to avoid delays and complications.
By unboxing your loft ladder and checking that you have all the parts and tools you need, you can ensure that the installation process goes smoothly and that you can complete the installation quickly and efficiently.

4. Install support battens into the ceiling/opening.
Before you can install your loft ladder into the opening you have created, you will need to add some support battens to the ceiling. These battens will support the frame of the ladder and ensure that it is secure and stable.
To install the support battens, you will need to measure the overall depth of the ceiling joists, plaster, and any boarding that has been installed. Once you have these measurements, mark the dimensions on all four sides of the box frame.
Next, nail or screw a length of 50x25 sawn batten along each side of the box frame so that the bottom edge is level with the marks you made. Make sure that the battens are securely fixed and level with one another.
Once you have installed the support battens, you can then place the frame of the loft ladder into the opening and secure it in place. This will involve attaching the ladder to the support battens and ensuring that it is level and secure.
It is important to take your time during this process to ensure that the ladder is properly installed and safe to use. If you are unsure about any aspect of the installation process, it is always best to seek professional advice or assistance.

5. Install the loft ladder into the opening.
Now that you have created the opening and prepared the ladder, it's time to install it. Follow these steps:
- Place the ladder into the opening and position it correctly. Ensure that it is level and flush with the ceiling.
- Secure the ladder into place using screws and brackets. Make sure that the ladder is securely attached to the joists and that there is no movement.
- Test the ladder to make sure that it is functioning correctly. Climb up and down the ladder to ensure that it is stable and safe to use.
- Install any additional components, such as handrails or grab bars, if necessary.
- Finish the installation by sealing any gaps around the ladder and the opening. This will help to prevent drafts and heat loss.
Remember to follow the manufacturer's instructions carefully when installing the ladder. If you are unsure about any aspect of the installation process, seek professional advice.
By following these steps, you can successfully install a loft ladder and gain easy access to your loft space.

6. Install & Secure Hatch
Now that you have installed the loft ladder, it's time to install and secure the hatch. Follow these steps to complete the installation process:
- Place the hatch frame into the opening and ensure that it is level. Use shims to level the frame if necessary.
- Once the frame is level, secure it in place using screws. Make sure to use screws long enough to go through the frame and into the ceiling joists.
- Next, attach the hinges to the hatch and the frame. Make sure that the hinges are flush with the frame and hatch.
- Once the hinges are attached, test the hatch to make sure it opens and closes smoothly. If there are any issues, adjust the hinges as necessary.
- Finally, install the latch to keep the hatch securely closed. Make sure that the latch is centered and flush with the frame.
Congratulations! You have successfully installed a loft ladder and hatch. Remember to always follow safety precautions when using the ladder, such as wearing non-slip shoes and using the handrail.
7. Ensure your loft ladder is opening in the correct direction.
Before installing your loft ladder, you need to ensure that it is opening in the correct direction. This will depend on the layout of your loft and the position of the joists. It is important to check this before beginning installation to avoid any potential issues down the line.
To determine the correct direction for your loft ladder, you should first mark the position of the opening on the ceiling. Make a trial hole in the centre of the marked opening and cut a small section of plasterboard. Check the position of the ceiling joists and adjust the position of the opening if necessary.
The ladder should be installed running in the direction of the joists, and not against them. This will ensure that the ladder is properly supported and secure. If the ladder is installed against the joists, it may not be able to support the weight of a person, which could lead to a dangerous situation.
Once you have determined the correct direction for your loft ladder, you can proceed with the installation process. Remember to wear safety goggles, a dust mask, and gloves during installation to protect yourself from any potential hazards.
In summary, ensuring that your loft ladder is opening in the correct direction is an important step in the installation process. Take the time to check the position of the joists and adjust the opening if necessary to ensure that your ladder is properly supported and secure.

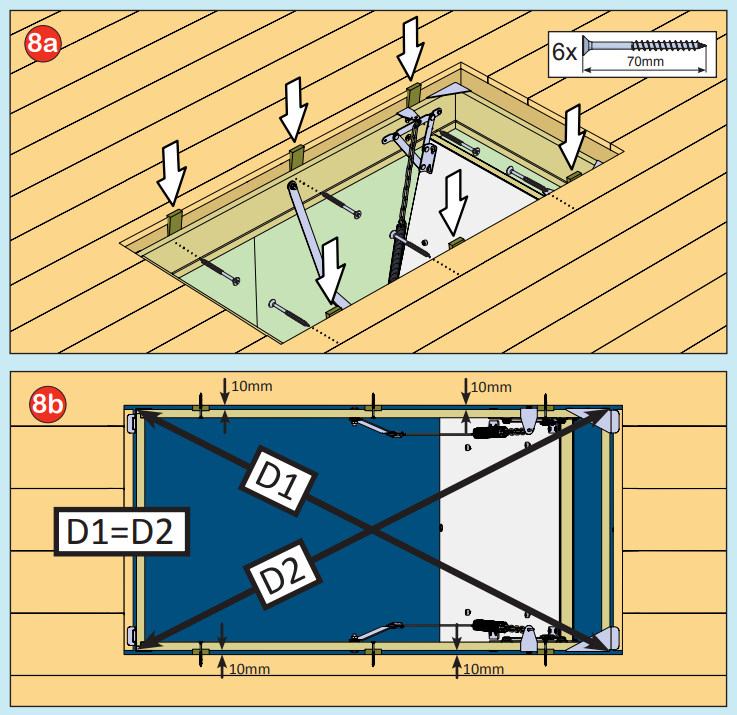
8. Secure the loft ladders folding section & steps to opening.
Once your loft ladder is in place, you need to secure the folding section and steps to the opening. This is an essential step to ensure that the ladder is safe to use.
First, check that the ladder is level and that the folding section is flush with the floor. If it's not, you may need to adjust the ladder or the opening.
Next, secure the ladder to the opening using screws. Make sure you use screws that are long enough to go through the ladder and into the joists. You may need to use packing pieces to ensure a tight fit.
Once the ladder is secure, test it by climbing up and down a few times. Make sure that the ladder is stable and that the folding section and steps are secure.
Finally, if you have a hatch, make sure that it is securely fastened to the ceiling. You may need to add extra screws or brackets to ensure that the hatch is stable.
Overall, installing a loft ladder can be a challenging task, but with the right tools and techniques, it's a job that you can do yourself. By following these steps, you can ensure that your loft ladder is safe and secure, and that you can access your loft space with ease.

9. Connect final bolts & hinges.
Now that you have secured the ladder in place, it's time to connect the final bolts and hinges. These will ensure that the ladder is stable and safe to use.
Firstly, ensure that the hinges are in the correct position and that they align with the ladder. Then, insert the bolts through the hinges and the ladder. Tighten the bolts using a spanner or wrench to ensure that they are secure.
Next, connect the final bolts to the hatch frame. These bolts will hold the ladder in place and prevent it from moving around when in use. Make sure that the bolts are tightened securely and that the ladder is stable.
Finally, check that the ladder is working correctly. Pull it down and make sure that it opens and closes smoothly. Test it by climbing up and down a few times to ensure that it is safe and secure.
Congratulations, you have successfully installed your loft ladder! With a little bit of patience and careful planning, you can enjoy easy access to your loft space in no time.
10. Test your loft ladder.
Once you have installed your loft ladder, it is essential to test it before using it. Testing your loft ladder not only ensures your safety but also helps identify any issues that may need fixing.
To test your loft ladder, follow these steps:
- Make sure the ladder is securely attached to the hatch and the floor. Check that all screws and bolts are tight.
- Extend the ladder to its full length and lock it in place. Ensure that all the rungs are level and secure.
- Climb up the ladder slowly and steadily. Check that the ladder does not wobble or sway.
- Once you reach the top, stand on the last rung and check that it is stable.
- Climb back down the ladder slowly and steadily, ensuring that the ladder does not wobble or sway.
- Check the hatch for any signs of damage or stress.
- Ensure that the hatch closes and seals properly.
- Repeat the test a few times to ensure that the ladder is stable and secure.
If you notice any issues during the test, such as wobbling or instability, do not use the ladder until you have fixed the issue. It is essential to ensure that your loft ladder is safe and secure before using it.
Conclusion
Congratulations! You have successfully installed your loft ladder. Now, you can easily access your attic space without any hassle. Remember, safety is of the utmost importance, so always follow the safety guidelines and use protective gear like safety goggles, dust masks, and gloves.
Here are a few key takeaways to keep in mind:
- Choose the right location for your loft ladder and hatch. It should be easily accessible and not too close to the external wall of the house.
- Measure and prep carefully before cutting the opening for your loft ladder.
- Use the right tools and materials for the job. A loft ladder kit, measuring tape, pencil, screwdriver, drill, screws, spirit level, safety goggles, dust mask, and gloves are essential.
- Follow the manufacturer's instructions carefully when installing your loft ladder.
- Always test and safety check your loft ladder before using it.
Remember, if you're not comfortable installing your loft ladder yourself, it's always best to hire a professional to do the job. They have the necessary skills and experience to get the job done safely and efficiently.
With these tips in mind, you can enjoy easy access to your attic space and make the most of your home's storage potential.

Video View:
See our video installation instructions for Keylite loft ladders.
See our video installation instructions for FAKRO loft ladders.