
How to Remove Moss From a Roof Without Damaging it?
4th February 2019
A cornerstone of getting your house sold or keeping it in tip top shape for your family to live there is to ensure that the roof is appropriately maintained, with broken tiles being replaced and appropriate sealing installed.
The presence of moss or algae on your roof can lead to costly repairs as the materials protecting your home are gradually worn away by unsightly growths that manifest themselves there. And if you’re living in a particularly humid area, the problem can be so much worse!
Eventually, the moisture maintained by moss can mean that the structures that hold up your roof, such as the sheathing, can become damaged over time and corrode. The moss is also likely to find its way towards your drainpipes and cause a blockage - which means your pocket takes a huge hit.
If you have been blighted by some unsightly green moss of your roof, here are a few tips and tricks to get your roof looking ship shape and how to manage the problem to prevent it returning…
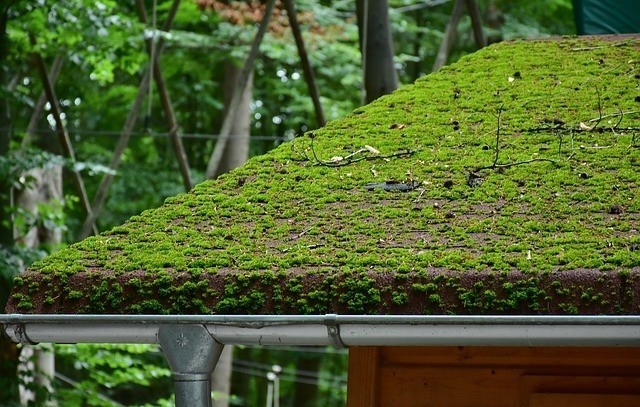
Image provided from Schoenherr Roofing
Avoid a Pressure Washer
When it comes to deep cleaning hard to reach areas, the temptation to reach for a costly pressure washer to help blast the problem away can be very tempting… but in this case, it’s actually one of the worst things you can do.
Moss is able to begin growing when it roots itself under the tiles in your roof, in the spaces between the shingles where it is cool and shaded from direct sunlight so that they don’t dry out – and by using a pressure washer, you’re actually pushing these spores further under the shingles, and all across your roof rather than just the spot that you are trying to tackle.
If there is already existing damage to your roof as a result of the moss, you’re likely to soak the inside of your house as water leaks through any space it can! The sheer force of the pressure washer can break roof tiles, which means that a more manual approach works a little better.
Use a Brush and a Trowel
To avoid unnecessary damage to your roof, you should be able to competently remove the damage yourself or by hiring a professional to clear the problem for you.
If you’re confident in accessing your roof safely yourself (and only if you’re confident, seriously consider hiring a professional if you’re not!), you can get rid of the moss by hand by simply scrubbing and scraping the issue away. To make it easier and safer, there are a variety of hard and soft bristled brushes designed exactly for this task, and many come with long handles to help you to reach into the hard to get areas.
If you do opt for this method, it’s important to be gentle so as not to risk damaging the binding that holds your roof shingles in place.
Use Chemicals Specifically Intended for Moss Removal
Once most of the moss has been cleared, it’s best to use an industrial strength chemical to get rid of any leftover spores that you can’t see either because they’re so small or because they’re lurking underneath your roof tiles, which will help to prevent the issue from coming back again.
There are a variety of cleaners on the market, and a lot are available online which makes it easily accessible if you are considering tackling it alone. For example, Wet and Forget is a popular spray-on product to get rid of algae, moss and mildew, or Moss B Ware can be used either dry or mixed with water.
Have Zinc and Copper strips Installed
If you’ve got an abundance of moss on the roof that needs to be removed, or you’re looking to prevent the issue from taking hold in the first place, you might like to look at having zinc or copper strips installed as a preventative measure.
They work by making the roof an uninhabitable area for moss to grow or thrive; by being placed at the very top of the roof, they make sure that when it rains, the raindrops absorb metal particles from the strips which then pass down the roof and poison the moss and any other plant life that is hanging around. This causes the moss to dry out, and eventually fall off the roof altogether, leaving only the metal particles distributed over the roof which will stop the problem from returning.
It’s important before installing these, that most of the existing moss is cleared away first to allow the strips to work properly. When fitting these strips, it’s best that they sit under the shingles with a little space below them and that they lie as flush to the roof as possible to prevent the metal from warping.
Follow these simple steps and say goodbye to unsightly roof moss forever!