
How to install VELUX window.
28th March 2023
This is the most complete guide on the internet on how to install VELUX window.
Installing VELUX roof windows can be easy. VELUX windows are renowned for their ease of installation within the roof window market. So, here is our quick and easy guide on how to install a VELUX window and other contributing factors.
In this blog, we will cover how to install a VELUX window into a tile roof. Tiled roofs are the most common within the UK and are the majority used in coherence with the VELUX window.
What tools do i require to install VELUX window?
These are our suggested tools to install VELUX window and are no means absolutely necessary.
- Installation guide provided in the box.
- Carpenter’s square
- Crowbar
- Spirit level
- Utility knife
- Screwdriver
- Screws
- Tape measure
- Angle grinder
- Drill
- Pencil
- Safety equipment including gloves and goggles.
How to install VELUX window?
- Unbox your VELUX roof window.
- Layout each part and view installation instructions provided.
- Remove the sash from the VELUX window frame.
- Create the structural opening in the roof.
- Install the VELUX frame.
- Install the VELUX flashing.
- Finish tiling.
- Installing the vapour barrier.
Step 1: Unbox your VELUX roof window.
Unboxing your VELUX window when on site has to be precisely done. It is important to give your 100% attention to this step, when unboxing no parts of the roof window are damaged and are in a condition where the VELUX window can be fitted.
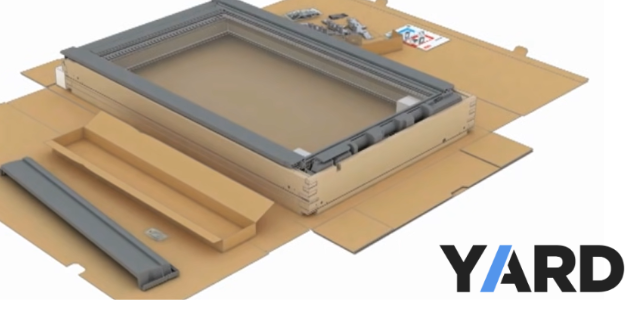
Slowly lay your VELUX box flat and facing up. Press the tabs In and open up the box as if it were a mat. This will allow you to create a work surface for unboxing each part of the VELUX roof window, again without causing any damage.
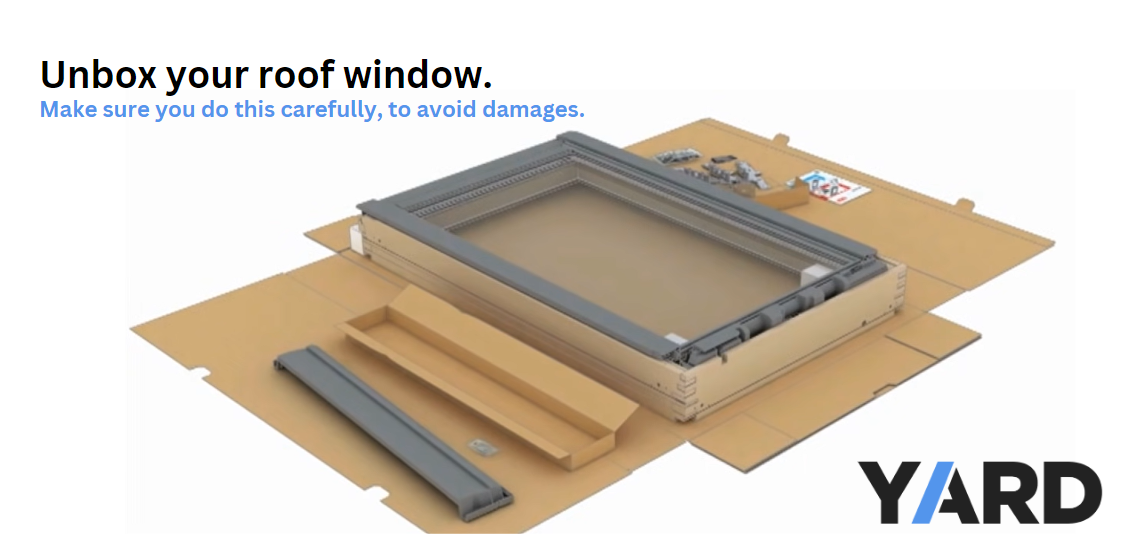
Each box will contain a VELUX window, insulation brackets and fixings in a separate box, and the top cover part for the VELUX roof window. Each window should also include an installation guide for the install of the VELUX window.
- If you are installing the VELUX window to a tiled roof (Thick interlocking, between 15mm-120mm thick a and on a roof pitch of 15-90 degrees), you will require a VELUX EDW flashing kit.
- If you are installing the VELUX window to a slate roof (Slate up to 8mm and on a roof pitch of 15-90 degrees), you will require a VELUX EDL flashing kit.
- If you are installing the VELUX window to a thick flat tiled roof (Interlocking flat tiles from 15mm-40mm thick and on a roof pitch from 20-40 degrees), you will require a VELUX EDT flashing kit.
- If you are installing the VELUX window to a plain flat tiled roof (non-interlocking flat tiles up to 14mm thick and on a roof pitch between 25-90 degrees), you will require a VELUX EDP flashing kit.
- If you are installing a VELUX on any other profiled roofing materials (from 15mm-120mm in thickness and on a roof pitch of 15-90 degrees), you will require a VELUX EDW flashing kit.
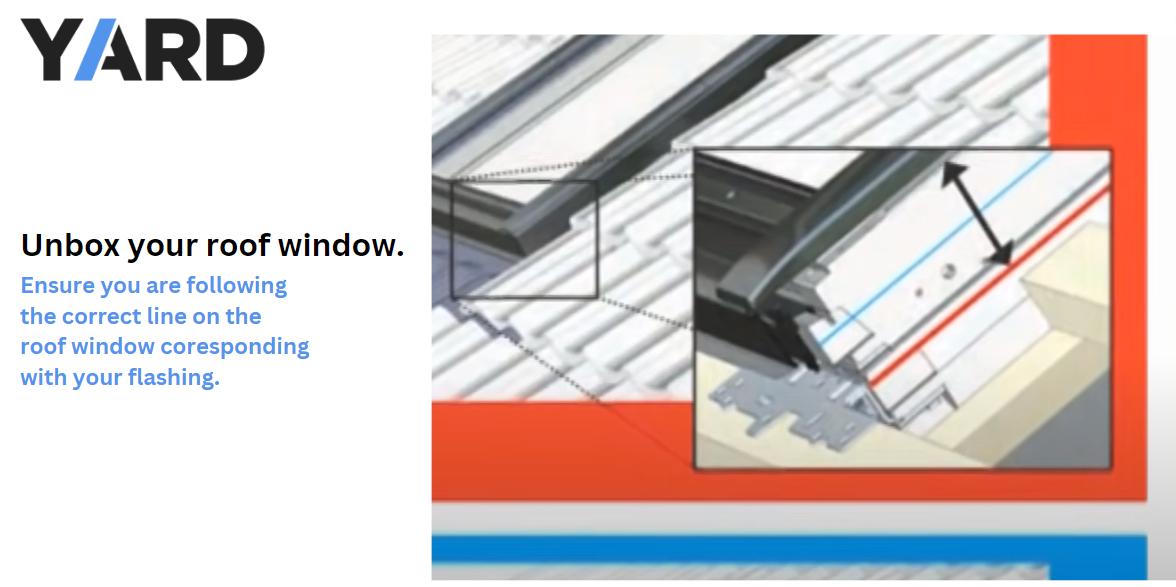
When installing VELUX windows, you need to ensure the colour code on your box matches the colour code within the provided installation instructions. For example, we will be using a EDW tiled roof as our preferred method, so we will follow the red line. For EDL slate roofs you would use the blue line.
For finding all other installation instructions for VELUX windows. Including videos and over the phone from our roof window experts. You can contact our team on 01786 357 252.
Step 2: Layout each part provided within the box andview VELUX installation instructions.
Leave the window lying flat on the disassembled box in the previous step. Layout each part individually and do not rest any parts on the glazing of the roof window. If you have ordered from us. If you believe there to be any parts missing from the box, please call us immediately.
Make sure you have the windows installation instructions within the VELUX box with you are all times. If you learn more digitally. You can watch our series of installation videos underneath each product on our website.
Step 3: Remove the sash from the VELUX frame.
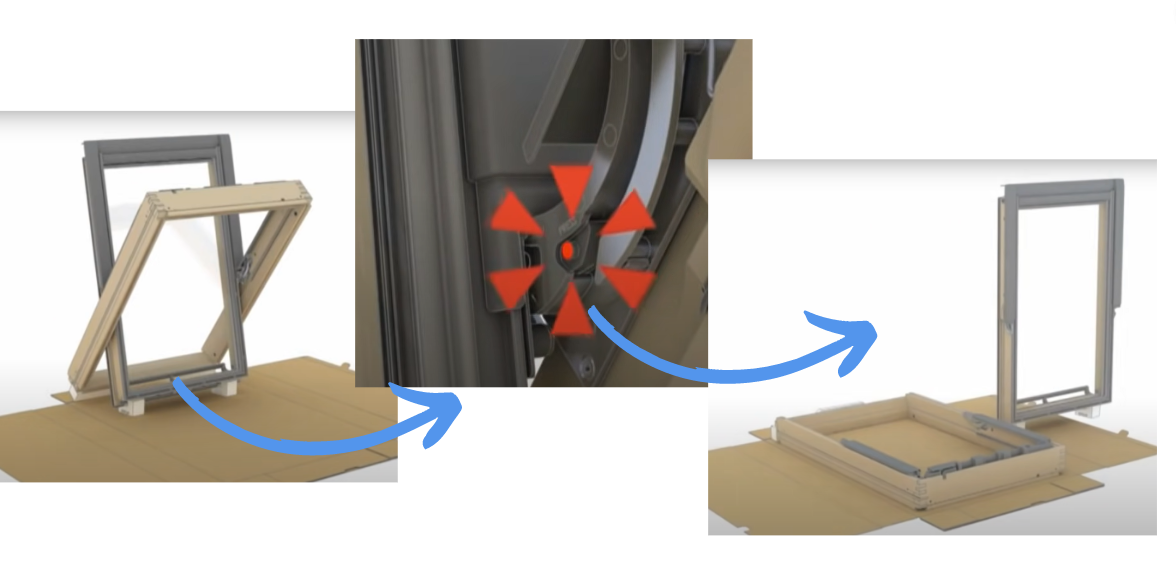
With as many people as required (depending on the type of VELUX window) slowly raise the window up to a upright position. Remove all polystyrene protection blocks from around the VELUX window. Now, open the VELUX handle located at the top of the roof window (on centre-pivot models). To open the handle, grab the bar with two hands and pull towards you (sometimes required in a downwards motion). Sometimes, VELUX window handles can be quite hard to open so a little force may be needed at first. However, if you believe the window is broken. Do not force its sash to open and again contact us immediately.
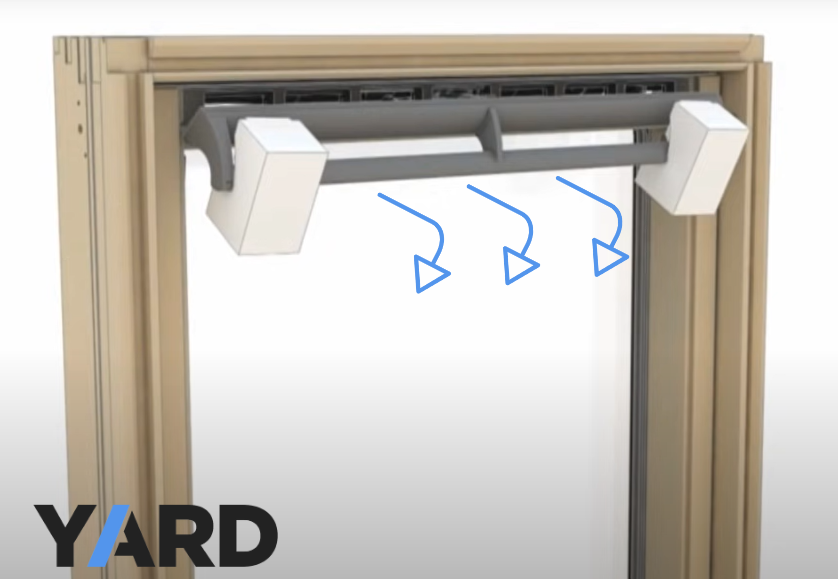
Once the handle is open swing the sash of the roof window into an open position. Take the polystyrene protection blocks and place them on the corners at the top of the sash.
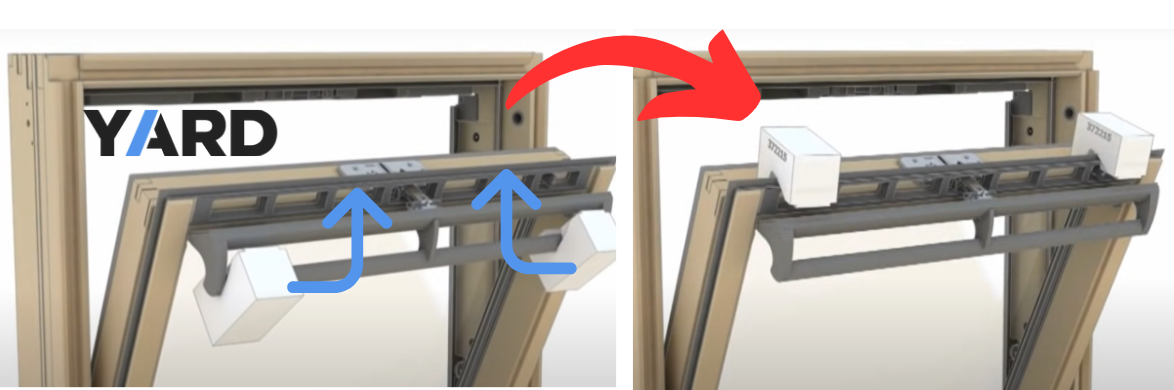
Then, slowly rotate the sash until the polystyrene blocks gently rest against the floor. Once the window is resting safely, disconnect the sash from the roof window frame using the two circular buttons at each side of the window via the hinges. This can be done by using a screwdriver to gently push the buttons in. Now the sash is removed. Please carefully lift and place somewhere safe until a later step. We suggest keeping this away from heavy equipment, machinery and any other elements that could damage the roof window.
Step 4: Create the structural opening in the roof.
It is important to pre-plan the structural opening in the roof to ensure it is right first time to avoid mishaps that could lead to lengthy and costly retries.
VELUX windows are measured at the point of sale and on their VELUX, window codes via their external frame sizes. This is the measurement around the perimeter of the VELUX windows frame.
The width of the opening in the roof should be 40-60mm wider than the external frame size (the VELUX window) itself. So, for example a VELUX GGL MK04 (78cmx98cm) the structural opening size will be 82-84cm. Take bottom installation batten and install so the top edge is roughly 80mm above the first row of tiles below the window. Make sure the batten is level and remember to always measure upwards. Add an overall of 45mm onto the external frame size to create the height of the structural opening size. So, again using our GGL MK04 (78cmx98cm) example. The height of the opening should be around 102.5cm. Now install the top installation batten on this measurement. A GGL MK04 has an external frame size of 78cmx98cm but a structural opening size of 82-84cmx102.5cm as we add 40-60mm to the width and 45mm onto the height of the external frame size (MK04) to get the VELUX structural opening size.
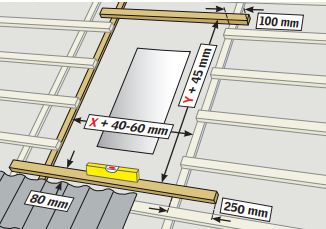
Ensure both battens overlap the width of the opening on either side by 100mm on the top and 250mm on the bottom.
Cut back any extra/un-needed felt and fit over both battens. This allows for better watertightness of the VELUX roof window. Once this is done, remove the row of tiles below the structural opening you have created.
Step 5: Install the VELUX window frame.
Installing VELUX windows insulation collar.
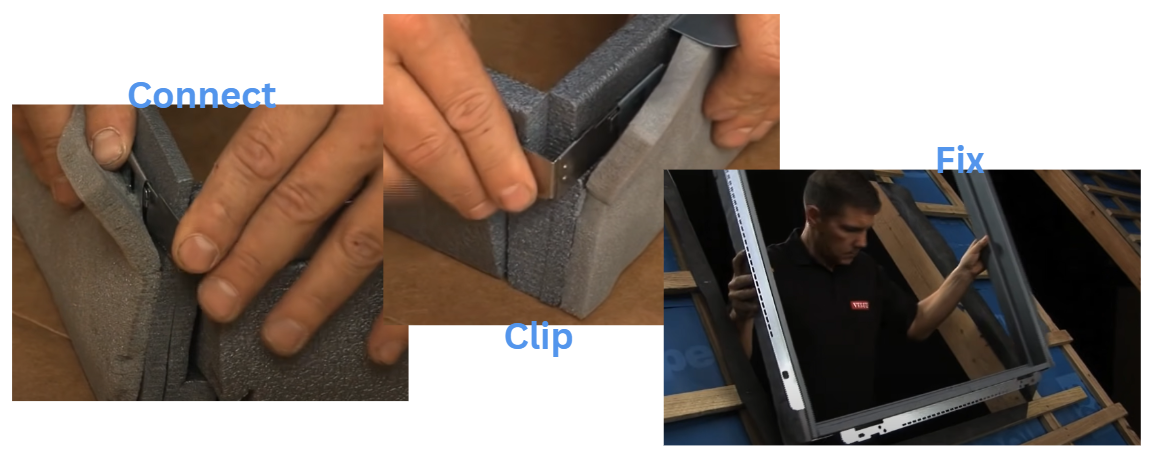
Clip the corners of the BDX insulation collar together, then place it into position within the window opening ready or the frame to be installed to the structural opening you just created.
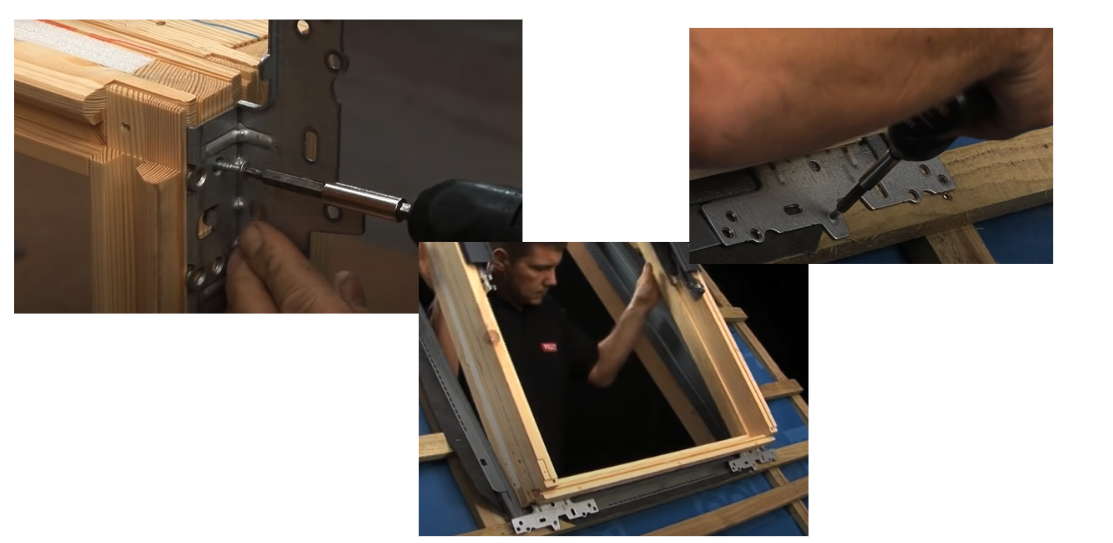
Installing the VELUX window brackets.
We now want to install the brackets to the window by following the installation instructions provided within the box. Around the window, there will either be a blue or a red line running down the side of the frame. Make sure you use the correct colour matching with your flashing kit. Install the brackets onto the correct line. For the red line, position the brackets and the top and bottom using the pre-drilled holes and safely drill into place. Too much force or going off-angle may damage or crack the frame of the roof window. So, its always best to fully concentrate during this step.
Now the brackets are in place. Gently lift the frame of the roof window (not the sash) over the windows structural opening. Install the bottom brackets on the frame into the support batten at the bottom with 30mm and 80mm screws. Which you can now find on our sister site YARDifxt. Make sure the screws are securely through the support and counter batten and comfortably secured into the rafter, if applicable to your project. For the top batten, use one 30mm screw in the horizontal holes on each of the brackets but leave 10mm leeway instead of the full 30mm, being secure. Part 5 of the VELUX flashing can be removed at this point.
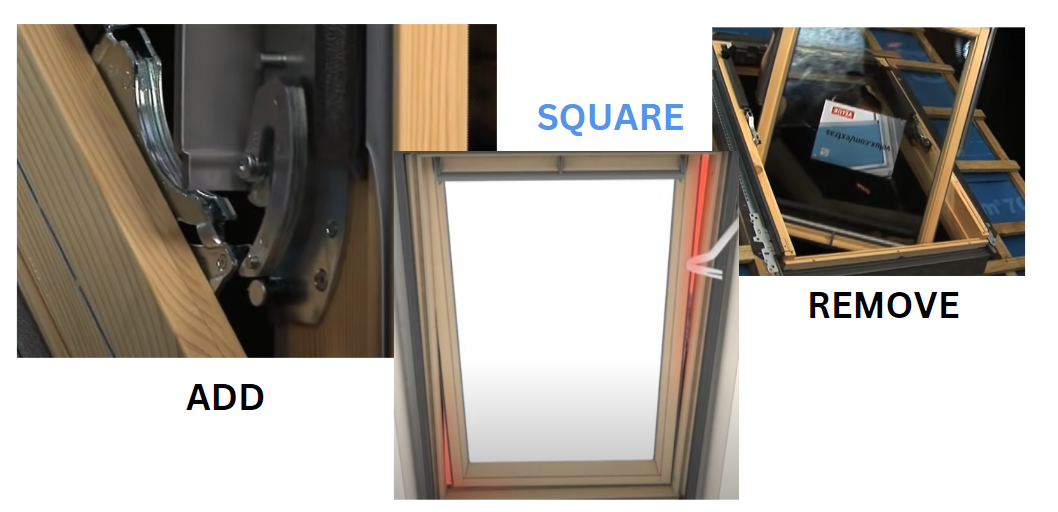
Adjustments to the frame.
You can now temporarily put the sash back into the roof windows frame. You can do this by placing the sash within the curved hinge at each side of the roof window. If there is a gap between the sides of the sash and the frame of the roof window, check if the gap is larger at the top than the bottom on one side. Use the crowbar to make budge, moving the other edge of the frame to make the frame of the roof window completely square. The window frame being square is essential to the energy efficiency, watertightness, and life-time performance of the roof window. So this is important to complete.
Now open the sash and make sure the gap between the sash and the frame is now even. If the gap is not equal on either side. Take the wedge within the flashing box and insert it into the bracket on the top corner than is parallel to the side with the larger gap. This will adjust the gap between the frame and the sash to be equal.
Now your VELUX window is square, you can now remove the sash. Carefully, disengage the sash using the two circle buttons on the curved hinge on either side of the window. Lift carefully out the window frame and rest the sash somewhere safe. Preferably on the opened-out box we created as a works surface. Now your VELUX window is square, please proceed to screw in the screws you lest sticking out by 10mm. Once this is done, the 80mm screws. Again making sure they properly secure through the supporting batten, counter batten and comfortably into the rafter.
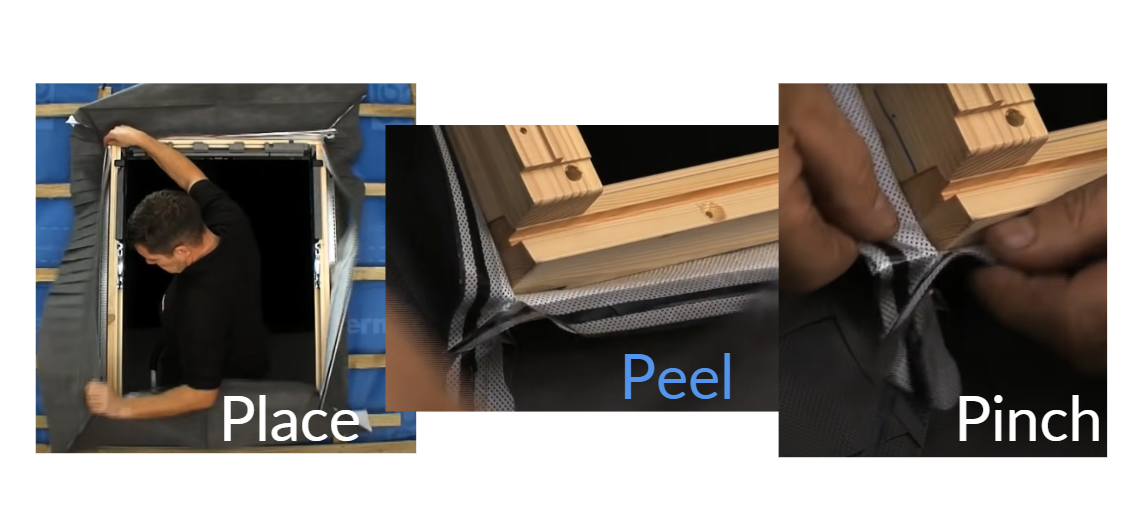
Fit the underfelt collar.
It is now time to fit the BFX underfelt collar, which is used to create a strong barrier between the roof window and the membrane. This helps protect your home from the elements and cooler air from entering your property. These come in both the Pro and Pro+ VELUX flashing kits.
Mark the position of the VELUX drainage gutter and place this at a slight angle to allow for a clear channel flow for water to run off and around your roof window. This allows the water to run down the underlay on your roof. If you have counter battens, cut it so it allows the channel gutter to fix to the rafter. Make an opening in the underfelt to make room for the gutter and add waterproofing sealant to the edges of the opening to prevent any gaps or openings that may promote leakage and a weakness in energy efficiency. Now, place the underfelt collar around the VELUX window frame. The top of the frame should be matched with the side of the underfelt which has more material. Remove the adhesive strips on the BFX underfelt collar and stick the collar to the edges of the windows frame. Make sure you pinch and correctly connect the corners of the underfelt snug to the windows frame. Use your staple gun to secure the collar to the roof battens, and any cuts you make to the counter battens. Now, install the channel gutter into situ at the top of the roof window, then securely fold the underfelt over and into the channel gutter. Now we have installed the majority of the roof window. Make sure you remove any excess material and use the clips provided in the box to secure the felt into the gutter, securing it into the channel gutter.
Step 6: Install the VELUX flashing.
Remember in this case we are using the VELUX EDW. However, some other VELUX flashing kits may include VELUX EDL, EDP, EDT, EDJ and EDN. Which each installation may look slightly different. So, please refer to the instructions provided in the flashing box.
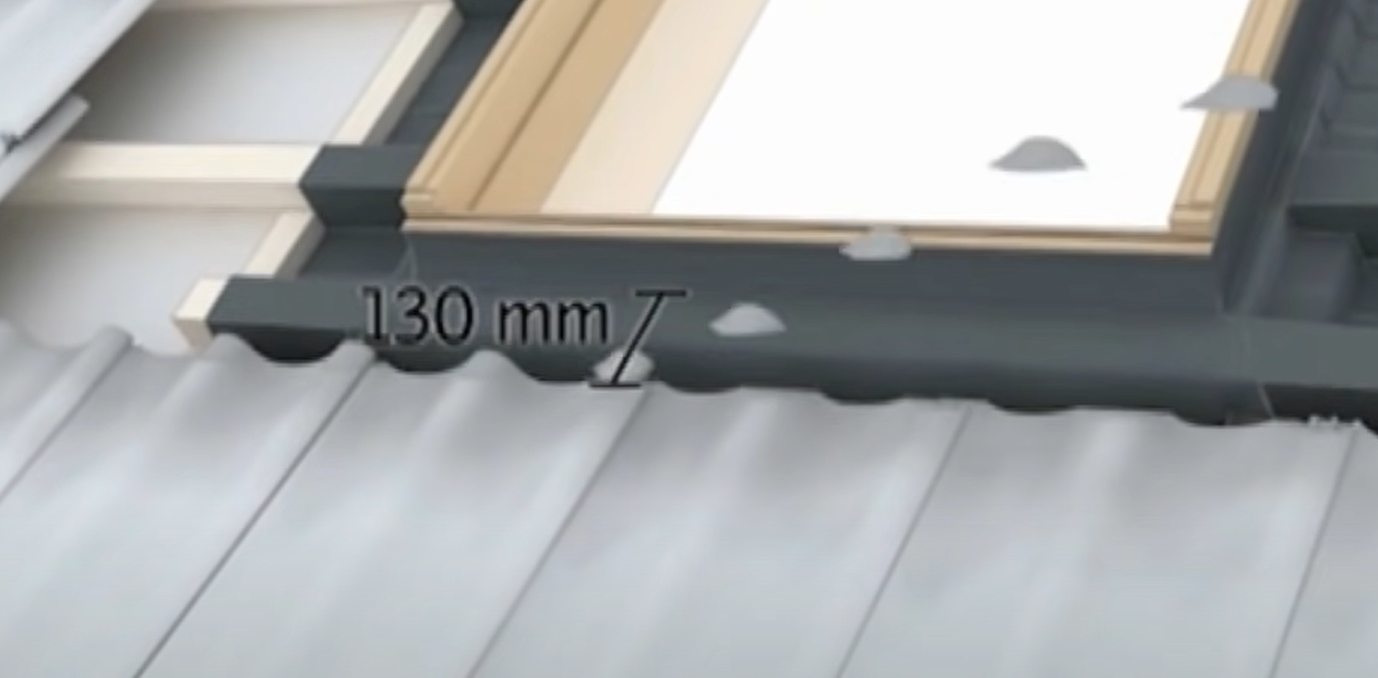
Chamfer the tiles for better effect.
For our example, we are using the VELUX EDW flashing kit for profiled tiles. The tiles need to be chamfered at the bottom of the window to ensure that the top of the tiles are at a maximum of 130mm from the bottom edge of the window. This is necessary for the bottom apron on the flashing to sit correctly to allow water to run off the window.
Installing the apron flashing.
Take the lower section of the bottom apron on the VELUX flashing and move into position. Now, morph the flashing to match the shape of the tiles so it can securely fit over the flashing in adherence with the tiles shape. Now bend the pleated section of the flashing back by 45 degrees, this helps the security of the flashing to the tiles. Gently secure back into position and screw it into place and install part 2 to secure this to the bottom and sides of the frame.

Installing the VELUX side parts.
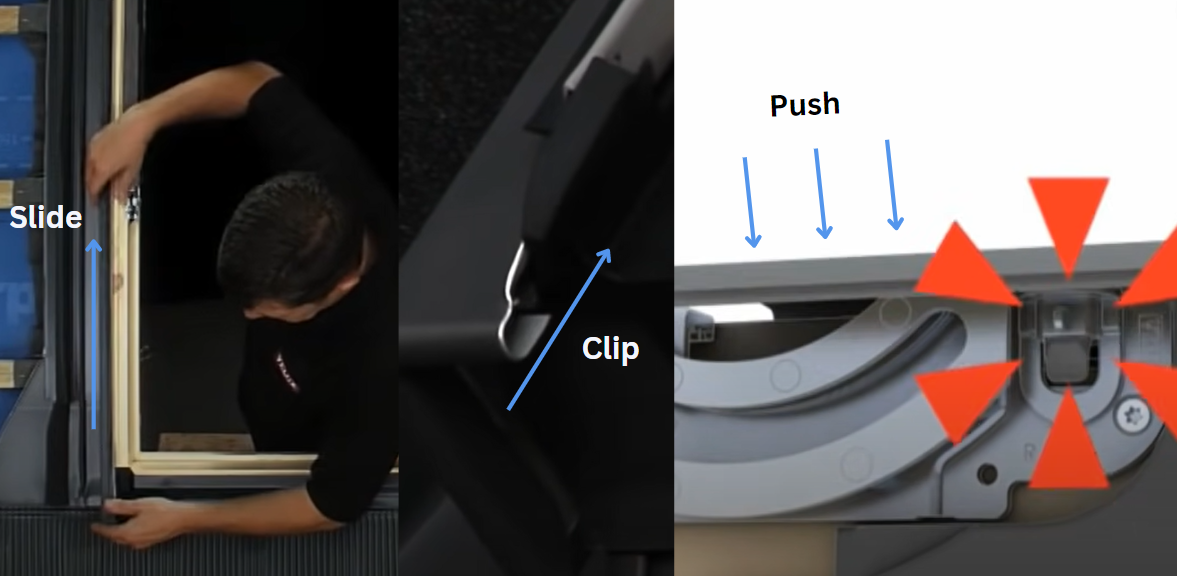
We suggest removing the top side coverings attached to the roof window frame (part 5) straight after this step, you can do this by pressing in the button at the top of the curved hinge and carefully lift the connecting joint attached to the side covering out. Now place these somewhere safe. You are now ready to install the side of the VELUX flashing kit. Slide the side parts (part 3) into place and secure them with the pre-installed tabs. Secure this further by carefully using a nail.

Installing the side cover parts.
Wow, you’re flying. We are nearly there! Now your side flashing is in, its now time to install the side covers. Slide these upwards onto the side of the window from the bottom until the bottom ridge secures into the black rubber clip on the bottom corner. Make sure it catches onto the clip and is secure.
You can now re-attach part 5 – the top side coverings. Retrieve the parts and slot in so the top of the cover part clips into the clip at the top of the window, and the pin underneath the part clips into the joint at the top of the frames curved hinges.
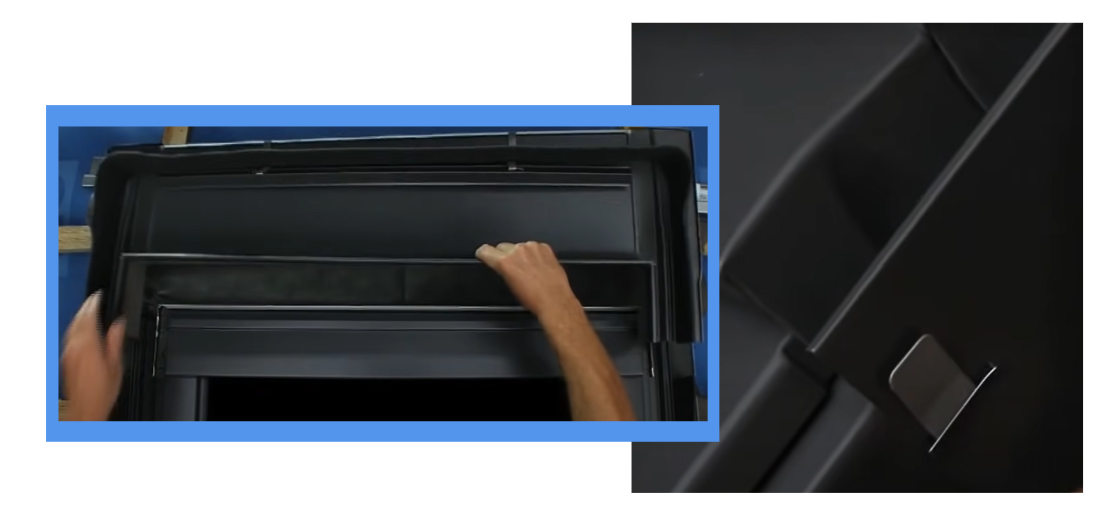
Installing the top covering and the hood.
We are now about to install VELUX flashing parts 6 and 7.
Top covering – Place part 6 into place at the top of the window and screw in at each side.
The hood - Now place over part 7 of the flashing and fold the clips attached to the side covering into the pre-cut slot in the part 7 hood section of the flashing to securely join them together.
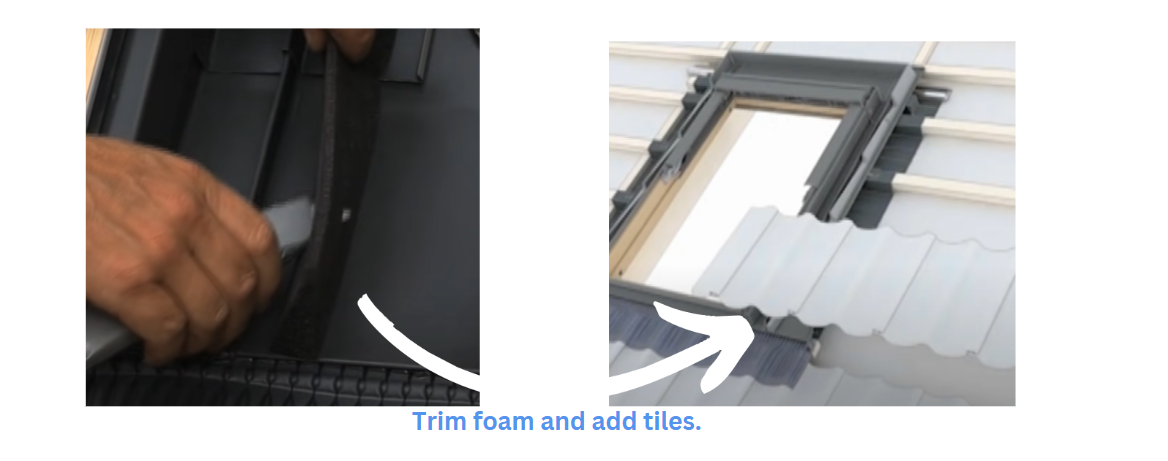
Step 7: Finishing exterior -Tiling.
Good work, keep it up! We are now on the last step of the exterior of the roof window and it is now time to finish off the tiles. Please ensure your flashing kit is correctly and securely installed before proceeding to this step.Trim back the excess foam around the roof window to make sure it matched the profile of the tiles where they meet for a snug fit for better performance and security. Allow room for a 60-150mm gap between the window and the tile for rainwater to have access to the drainage gutter on your roof window. Make sure the bottom apron is fully secure and there is no un-purposed gaps between the window and the tiles.
Step 8: Installing the vapour barrier.
Phew, last step for installing your VELUX roof window. Fix the vapour barrier into the plasterboard lining of the window. Using the tools provided within the kit. Attach each corner with screws and tape it to the properties existing vapour barrier to ensure you get the best moisture and water tightness for the buildings structure.
Your VELUX window should now be installed. We hope you are confident with how to install VELUX window. However, is there is some things you are unsure on when fitting a velux window. Here is some FAQs to answer your questions.
FAQs
What is the cost of VELUX installation in the UK?
The cost of installing a Velux window can vary depending on a few factors such as the size of the window, type of glazing, roof type, and the complexity of the installation process. On average, the cost of installation is £980 for a 1:1 replacement per window, according to VELUX. This includes the cost of the window and labour charges. It's important to get multiple quotes from reputable contractors to get an accurate estimate for the cost of installing a Velux window.
How long does it take to fit a VELUX?
The amount of time it takes to fit a Velux window can depend on various factors, such as the size of the window, type of roof, and the complexity of the installation process. However, on average, it can take between 2-4 hours for a professional contractor to install a Velux window. This timeframe includes preparing the opening, fitting the window, and making sure it is sealed properly. For a DIY project, it may take longer, as it can be more challenging without the necessary experience and tools.
Can a homeowner fit a VELUX?
Yes, it is possible for a homeowner to fit a Velux window themselves, especially if they have DIY experience and the necessary tools. However, it's important to keep in mind that installing a Velux window can be a complex process, and if not done correctly, it can lead to problems such as leaks, drafts, or even structural issues. It's recommended that homeowners carefully read and follow the manufacturer's installation instructions, take safety precautions, and consider consulting with a professional contractor if they are unsure about any aspect of the installation process.
Where is the best place to find a VELUX installer?
To find a reputable Velux installer in the UK, there are several resources available. One option is to visit the official Velux website and use their "Find an installer" tool, which allows you to search for certified Velux installers in your area. Another option is to check online directories such as Checkatrade or Trustpilot, which provide ratings and reviews from previous customers. Or, you can contact us at YARD Direct and we can pass you on to our certified installers with the best prices and best experience.
Can you fit a VELUX window from the inside?
Yes, it is possible to fit a Velux window from the inside alone. The installation process involves cutting a hole in the roof, preparing the opening, fitting the window, and sealing it properly from the outside to ensure proper insulation and prevent any leaks. It's important to follow the manufacturer's installation instructions carefully and use the appropriate safety gear when working on a roof. If you're unsure about any aspect of the installation process, it's recommended to consult with a professional Velux installer who has the necessary experience and tools to complete the installation safely and efficiently.
Best tool for cutting hole for VELUX window?
The best tool for cutting a hole for a Velux window installation will depend on the type of roof material you are working with. Here are some options:
- For cutting through wooden roofs, a circular saw or reciprocating saw with a fine-toothed blade can be used. You can also use a jigsaw with a fine-toothed blade for more precise cuts.
- For cutting through concrete or tiled roofs, a diamond-tipped blade can be used with an angle grinder or circular saw. It's important to use a blade that is designed for the specific material to ensure a clean and precise cut.
Regardless of the tool you choose, it's important to take the necessary safety precautions, such as wearing eye and ear protection and using appropriate safety gear. Additionally, it's recommended to follow the manufacturer's instructions for the specific Velux window model you are installing and consult with a professional installer if you have any doubts or concerns about the installation process.
Wow, good work. You should now have fully installed your VELUX roof window and we hope you love it! We hope our blog made you confident on the topic of Install VELUX window and you are now comfortable while installing standard VELUX windows.
However, if you are having any issues or your VELUX window does not seem quite right. Please call us on 01785 357 252. Our team of experts are here to assist you with any implications while installing a VELUX window.
Replacing your roof window? Read our VELUX size guide for better assistance.