
Having trouble installing the VELUX EDN Flashing? YARD is here to help
23rd April 2021
TIPS FROM THE YARD: recessed flashings are different to standard flashings.
We have noticed a common theme when installers call our office at YARD Direct; you can't get the VELUX EDN Recessed Flashing to fit or its not sitting flush against the roof tiles. In this article I will explain the reason behind this issue, so you will be able to install future recessed flashings within minutes and avoid any possible chance of rain water leaking into the home.
Firstly you can't mistake VELUX EDN recessed flashings with VELUX standard flashings. They have different names so will require different installations.
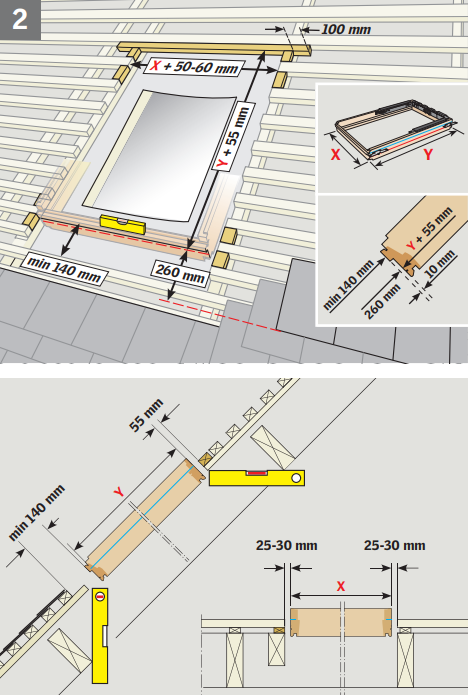
As an installer it is without doubt that know you need to cut the appropriate size hole in the roof for your flashing. This may be second nature to an installer as you know the ideal measurements for a standard flashing installation, which is great for a quick and simple install.
But recessed flashings require a little more thought when cutting a hole in the roof! As it says the flashing needs to sit flush on the roof, and so will require a larger hole, giving a greater gap for the flashing to appear recessed on the roof. These extra milliammeters will further make the tray sit flat against slate, preventing any water entering the property.
As you can see there requires a minimum of 140mm, and maximum 260mm, depending on flashing size.
This may be a simple adaption when onsite, but typically in Scotland, buildings have sarking boards as a form of insulation, which help protect the building against high winds, heavy rain or other extreme weather conditions. As an installer it is essential to be aware of this as it might require more thoughtful consideration when cutting a hole in the roof and installing the VELUX EDN recessed flashing.
Need more help installing the VELUX EDN Recessed Flashing, watch this video.